LC Easy

LC Easy 4.0 is an application that students and staff can use to learn how to understand the LC Classification system. It is designed in a game format and is readily available to here:

Windows App

This does not require a download nor any kind of installation on a local machine. But if you launch the program and you get denied access, please submit an INFORM. What that means is the user attempting to run LC Easy has not been added to the group authorized for access. Currently all student workers should have access as well as most Fulfillment staff.

Camtasia and Snagit

Have you been using Camtasia and/or Snagit to create materials?  TechSmith,  the creators or software,  has moved away from a standard perpetual license to a subscription model.  As a result,  we have moved to ScreenPal which includes both screen capturing and video recording in one package. ScreenPal (Screen-cast-matic) has been used by some staff for several years successfully.   Although this software also uses a subscription model for licensing it is much more reasonable for very similar functionality.  Please contact LTAS if you have any questions.

Why INFORM?

Often Library personnel will contact members of the LTAS staff directly for assistance. As members in this service profession, we are not going to turn you down, but we will often ask you to submit an INFORM or create a ticket for you. You may wonder, “Why do we do this?”

First and foremost, LTAS staff often are in the middle of tasks or meetings, conferences or even on vacation. So if you want to get your issue seen, always submit an INFORM. But then if there has been no movement within 72 hours, contact one of us and we will see what is going on.

Second, LTAS is staffed by multiple personnel who can assist – you should not rely upon one individual. Please make use of INFORM so the work can be distributed as needed.

Third, we really would like for you, the user, to submit the INFORM since only you can describe what you are experiencing. Having someone else submit the ticket for you often causes confusion and/or a back-and-forth exchange as we try to get more information. When submitting tickets, please provide as much details as possible so we do not have to approach you again with clarification. Otherwise, this will delay in resolving your issue.

And finally, we need to be able to objectively state we have been able to serve our users and one of the best ways we can do that is through INFORM. By providing this essential data, we are able to track issues and our responsiveness to resolving those issues. We can also track the volume and any possible patterns. For instance, the start of the semester we normally see an uptick in tickets so we need to plan for this accordingly.

So to address the question, “Why do we do this?” – it’s for your benefit, the user, in the long run. Work with us and help us make Vanderbilt Libraries the best place to work at Vanderbilt!

Directly accessing a network share

There are times when you need to access a network share, but you don’t need to have it mounted as a drive. There is an easy way to do this and here are the steps.

First, go to File Explorer. This is the folder at the bottom of your task bar in Windows 11:

Windows 11 File Explorer button
You’ll get something that looks similar to this:
File explorer window
At the top, where it shows “Home”, you will want to put the address of the network share you want to access:
Network share to access via file explorer
If you have been granted access, once you hit return, it should populate File Explorer with the folders in that share. Then, once you are finished with what you are doing and you close out File Explorer, that share will not be mounted as a drive. This is just a quick way to access a network share. If you have any questions about this, please do not hesitate to contact us.

Adding a Shared Exchange Mailbox to Outlook 365

Adding a Shared Exchange Mailbox to Outlook 365 is a little different from previous versions of Outlook. Here is a little step-by-step guide on accomplishing this task.

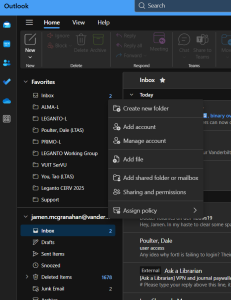
  1. Start Outlook 365 and next to your name, click the button with the 3 dots:

Outlook 365 More menu options

2. Click on the “Add shared folder or mailbox” option:

Add shared folder or mailbox prompt

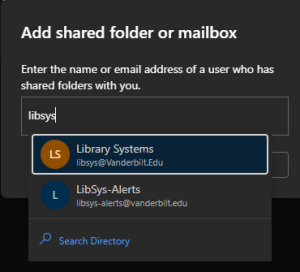
3. Enter the email address of the shared mailbox:

Begin entering the email address of the shared exchanged mailbox.

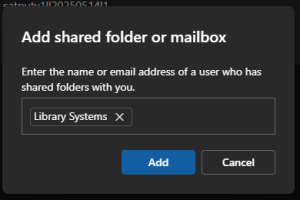
4. If Outlook recognizes the email address, it will pop up. Just click the one that you want and then select Add:

Outlook 365 identifies mailbox

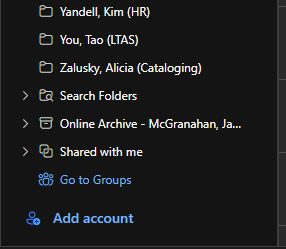
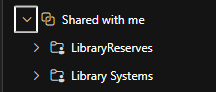
5. Now back in Outlook 365, in your list of folders, look for “Shared with me” folder:

Where to find your Shared Exchange Mailbox? Look in the "Shared with me" group near bottom of the listing of folders.

6. Expand that folder:

Expand the Shared with me group to see all of the Shared Exchange Mailboxes you have added.

And this is where your Shared Exchange Mailboxes are located.

A LibrarianÔÇÖs Guide to Cybercrime Mitigation – Review

Yesterday, I attended the Choice webinar, “A LibrarianÔÇÖs Guide to Cybercrime Mitigation” and it was one of the more rewarding webinars I have attended. It reminded me of why we do the things we do when it comes to security. I would encourage any and all Library staff to watch the recording, found here:

https://www.choice360.org/webinars/a-librarians-guide-to-cybercrime-mitigation/

They provided several tools that can help you yourself protect your digital footprint. From checking how secure your password might be to seeing if a website is malicious or not. Here are a few of the tools mentioned:

How secure is my password? https://www.security.org/how-secure-is-my-password/

Check if sites have been reported malicious: https://www.virustotal.com/gui/home/url

Check to see if your email address has been a part of a data breach: https://haveibeenpwned.com/

Please, secure your passwords; use a password manager; donÔÇÖt re-use passwords; and above all else, donÔÇÖt leave passwords laying around on sticky note! ­ƒÿè

Setting browsers to automatically clear history & cache upon closing (Update from 2020 post)

UPDATED version:

Sometimes our browsers get clogged and cause issues, especially when trying to access sites that are behind protective layers. Then we have to tell users to go clear their browserÔÇÖs history and cache. There is a way that this can be done automatically, though, when a user closes their browser. Please see below for how to do this based upon your preferred browser:

Edge (Version 100.0.1185.36 (Official build) (64-bit))
  1. Open the Edge browser
  2. Click on the 3 dots on the top-right and select “Settings”
  3. Click on “Privacy, search, and service”
  4. Click on “Choose what to clear every time you close the browser”
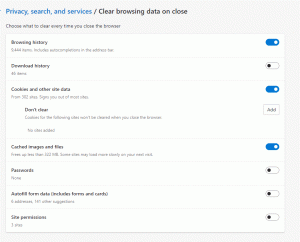
  5. Turn on at a minimum “Browsing history”, “Cookies and other site data”, “Cached images and files”

Edge privacy, search, and services settings
After this, you are done. ThereÔÇÖs nothing else you need to change for Edge (and there is no “Save” button). You can now start using your browser as normal and when you close it, it will automatically clear your history & cache for you.

Firefox (Version 99.0 (64-bit))

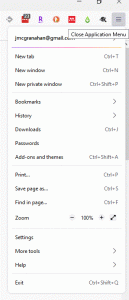
  1. At the top of the Firefox window, click the menu button on the right and then select Settings

Firefox menu options

  1. Click on Privacy & Security
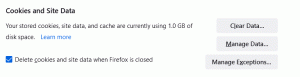
  2. Look for the “Cookies and Site Data” section click the check box next to “Delete cookies and site data when FireFox is closed”

Firefox cookies and site data settings

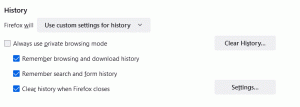
  1. Scroll down to “History” section and change the drop down next to “Firefox will” from “Remember history” to “Use custom settings for history”. Then click the check box next to “Clear history when Firefox closes”

FireFox custom settings for history
ThatÔÇÖs it. Like Edge, there is no “OK” or “Save” button ÔÇô it automatically saves your changes/updates so you can now use your browser as normal. And the next time you close it, it will automatically clear your history and cache for you.

Chrome (Version 100.0.4896.75 (Official Build) (64-bit))

  1. Open the Chrome browser
  2. Open the Chrome menu options (3 dots to the right) and then select Settings
  3. Click on Privacy and security
  4. Click the Cookies and other site data
  5. Scroll down until you see “Clear cookies and site data when you close all windows” and toggle it from off to on

Chrome cookies setting
Like the other browsers, there is no “OK” or “Done” button ÔÇô it automatically saves your updates. But this is it ÔÇô this is all you need to change.

Mapping drives

There are times where you need to map a network drive, either because you have lost access somehow or you have been granted access to a network drive. To do this, please follow the below instructions (to do this, you either need to be on campus or on the VPN):

Click on the File Explorer icon in the toolbar:

If you do not have the File Explorer icon, in the box “Type here to search”, click inside the box and enter “File Explorer”. If you do not have either the File Explorer icon or the search box, you can search the Start Menu for File Explorer.

Then in the window that pops up, click on “This PC”. It may also be labeled “My Computer”:
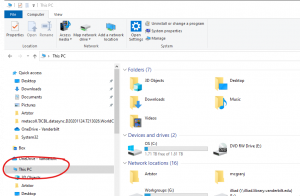
 

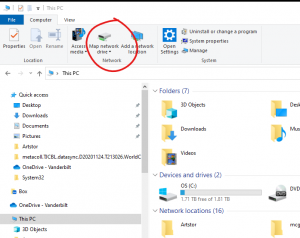
Then, in the top menu options, click the “Map network drives” button:
In the pop up windows that displays, change the Drive letter to whatever you want. For your personal drive, that will be N:. For the shared folders, that would be G:
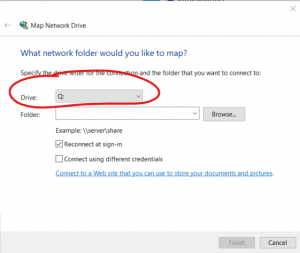
In the folder text box, enter the information you have received from LTDS. For the N: drive, that would be \\libshare.library.vanderbilt.edu\VUL\users\yourVUNetID and for the G: drive, that would be \\libshare.library.vanderbilt.edu\VUL\Workgroups. Any other network share would need to come from LTDS for the exact path.
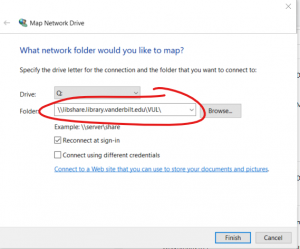
Make sure the “Reconnect at sign-in” box is checked. This way you won’t have to remember to do this – it will automatically reconnect to the network share upon relogin.

Click “Finish”. If you are authorized to access that network folder, it will automatically pop up with the folders/files. If you have any trouble or issues with this, please submit an INFORM.


Firmware Update Causing Black Screen

We have been getting reports of some people having their computers log in showing only a black screen and the mouse cursor. This is due to firmware updates from Dell. The solution is just to wait a very, very long time.

After the black screen, things will slowly start coming back, first the desktop background, then icons, and windows. Even after it looks like everything is back, often it needs to run longer. This process will most likely take at least several hours, maybe much longer. Letting it run overnight is a good idea.

You will know it needs to keep going if you have apps that wonÔÇÖt open or that misbehave in strange ways. If you shut down the computer too soon, it will start the long process over from the beginning next time you log in.

The computer going to sleep will also stop the update. Here is how to change the sleep settings on your computer to keep it from going to sleep during the update:

1. Click on the start/windows icon at the far left of your toolbar
2. Click on the settings icon, the gear-shaped one
3. Click System, then click Power & sleep
4. Under “When plugged in, PC goes to sleep after”, change the sleep setting to Never.

  As always, feel free to submit an INFORM ticket if you still have problems.

Set Browser to Clear Cache When Closing

Sometimes our browsers get clogged and cause issues, especially when trying to access sites that are behind protective layers. Then we have to tell users to go clear their browser’s history and cache. There is a way that this can be done automatically, though, when a user closes their browser. Please see below for how to do this based upon your preferred browser:

Internet Explorer

  1. Open IE browser
  2. Click Tools > Internet Options > Advanced tab
  3. Scroll down to the Security section and then check the box: Empty Temporary Internet Files folder when browser is closed
  4. Click OK

Firefox

  1. At the top of the Firefox window, click the Firefox button and then select Options
  2. Select the Privacy panel
  3. In the History section, set Firefox will: to Use custom settings for history
  4. Select the check box for Clear history when Firefox closes
  5. click the Settings button. The Settings for Clearing History window will open
  6. In the Settings for Clearing History window, click the check mark box next to Cache.
  7. Click OK

Chrome

  1. Open the Chrome browser
  2. Open the Chrome Toolbar (3 lines to the right of the URL window) and then select Settings
  3. Select┬áShow advanced settingsÔǪ
  4. Click the Content Settings button located under the Privacy section
  5. Under first section labeled Cookies, select Keep local data only until you quit your browser
  6. Click Done