Why INFORM?

Often Library personnel will contact members of the LTAS staff directly for assistance. As members in this service profession, we are not going to turn you down, but we will often ask you to submit an INFORM or create a ticket for you. You may wonder, “Why do we do this?”

First and foremost, LTAS staff often are in the middle of tasks or meetings, conferences or even on vacation. So if you want to get your issue seen, always submit an INFORM. But then if there has been no movement within 72 hours, contact one of us and we will see what is going on.

Second, LTAS is staffed by multiple personnel who can assist – you should not rely upon one individual. Please make use of INFORM so the work can be distributed as needed.

Third, we really would like for you, the user, to submit the INFORM since only you can describe what you are experiencing. Having someone else submit the ticket for you often causes confusion and/or a back-and-forth exchange as we try to get more information. When submitting tickets, please provide as much details as possible so we do not have to approach you again with clarification. Otherwise, this will delay in resolving your issue.

And finally, we need to be able to objectively state we have been able to serve our users and one of the best ways we can do that is through INFORM. By providing this essential data, we are able to track issues and our responsiveness to resolving those issues. We can also track the volume and any possible patterns. For instance, the start of the semester we normally see an uptick in tickets so we need to plan for this accordingly.

So to address the question, “Why do we do this?” – it’s for your benefit, the user, in the long run. Work with us and help us make Vanderbilt Libraries the best place to work at Vanderbilt!

Directly accessing a network share

There are times when you need to access a network share, but you don’t need to have it mounted as a drive. There is an easy way to do this and here are the steps.

First, go to File Explorer. This is the folder at the bottom of your task bar in Windows 11:

Windows 11 File Explorer button
You’ll get something that looks similar to this:
File explorer window
At the top, where it shows “Home”, you will want to put the address of the network share you want to access:
Network share to access via file explorer
If you have been granted access, once you hit return, it should populate File Explorer with the folders in that share. Then, once you are finished with what you are doing and you close out File Explorer, that share will not be mounted as a drive. This is just a quick way to access a network share. If you have any questions about this, please do not hesitate to contact us.

Adding a Shared Exchange Mailbox to Outlook 365

Adding a Shared Exchange Mailbox to Outlook 365 is a little different from previous versions of Outlook. Here is a little step-by-step guide on accomplishing this task.

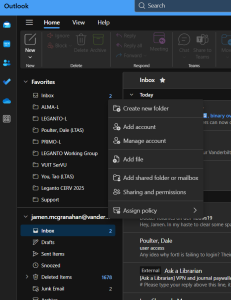
  1. Start Outlook 365 and next to your name, click the button with the 3 dots:

Outlook 365 More menu options

2. Click on the “Add shared folder or mailbox” option:

Add shared folder or mailbox prompt

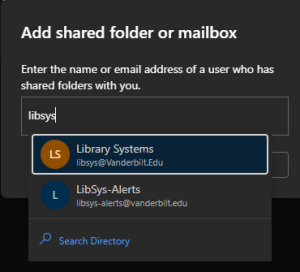
3. Enter the email address of the shared mailbox:

Begin entering the email address of the shared exchanged mailbox.

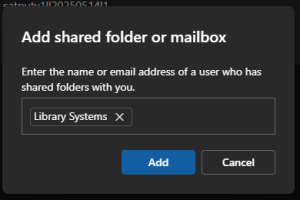
4. If Outlook recognizes the email address, it will pop up. Just click the one that you want and then select Add:

Outlook 365 identifies mailbox

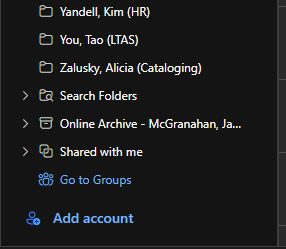
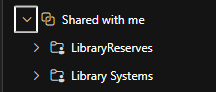
5. Now back in Outlook 365, in your list of folders, look for “Shared with me” folder:

Where to find your Shared Exchange Mailbox? Look in the "Shared with me" group near bottom of the listing of folders.

6. Expand that folder:

Expand the Shared with me group to see all of the Shared Exchange Mailboxes you have added.

And this is where your Shared Exchange Mailboxes are located.